SS Richard Montgomery: The Missing Survey
One of Britain's most closely monitored shipwrecks sits beneath a conspicuous blank square in Wrecksite's bathymetry of the Thames Estuary.
There is a conspicuous blank square in the bathymetry of the Thames Estuary. Around it are the seabed and wrecks of the approaches to the Medway; inside it, almost nothing. At its centre sits a ship symbol marking one of Britain's best-known wrecks: SS Richard Montgomery.
The absence is slightly misleading. Richard Montgomery is not poorly surveyed. Quite the opposite. Few wrecks in British waters have been monitored as persistently or in such detail. High-resolution multibeam surveys have been undertaken regularly since 2002, building a record capable of measuring the movement and deterioration of individual parts of the structure from one survey to the next. The problem for Wrecksite is simpler: the underlying high-resolution wreck survey is not available in the bathymetric datasets used by the site.
A Liberty ship
SS Richard Montgomery was an American Liberty ship, one of more than 2,700 of the mass-produced cargo vessels built to sustain the Allied war effort. Constructed by the St. Johns River Shipbuilding Company at Jacksonville, Florida in 1943, she measured 7,146 gross tons.1
Liberty ships were deliberately conventional vessels. Their importance lay not in individual sophistication but in the speed and scale with which they could be produced. They carried food, vehicles, raw materials, machinery and ammunition across the Atlantic in quantities upon which the Allied campaign depended. Richard Montgomery was engaged in exactly that work when she arrived off the Kent coast in August 1944.
She had crossed the Atlantic with convoy HX-301 carrying a large cargo of munitions. The Maritime and Coastguard Agency describes the original load as some 7,000 tons. Her destination was the UK and ultimately Cherbourg, but on reaching the Thames Estuary she was ordered to wait at the Great Nore anchorage off Sheerness while a convoy formed for the onward passage across the Channel.1
20 August 1944
The anchorage was too shallow for the heavily laden ship. On 20 August, as the tide fell, Richard Montgomery dragged her anchor and grounded amidships on Sheerness Middle Sand, approximately 250 metres north of the Medway Approach Channel.1
The consequences became apparent quickly. By that evening the vessel was reported to be badly hogged: supported around the centre by the sandbank while the bow and stern were effectively left unsupported. An explosive-like noise was heard as steel plating began to split forward of the bridge. The following day a crack was evident in the hull and the forward end began to flood.2
The ship had effectively begun to break her own back.
Removing the cargo
An intensive salvage operation began. Stevedores from Gravesend were brought in on 23 August to discharge the cargo, but the structure continued to deteriorate beneath them. The following afternoon the hull cracked further and the bow holds flooded. By 8 September the ship had broken her back completely.2
Divers reported a crack extending down both sides of the hull, with the vessel clearly open on the starboard side. Cargo removal nevertheless continued, latterly with Royal Navy personnel involved. Worsening weather, the progressive sinking of the ship and concerns over the safety of the operation eventually brought the work to an end.
The 2025 survey report records that Richard Montgomery had been carrying about 6,127 imperial tons of cargo, principally munitions. Some 2,954 tons were salvaged from the two after holds, together with a small quantity from the 'tween deck of No. 3 Hold.2 The broader MCA historical account describes approximately half of the original cargo as having been removed before the salvage operation ended.1
What could not safely be reached remained aboard.
1,400 tons
Approximately 1,400 tons net explosive quantity of munitions remain within the forward section of the wreck, principally in Holds 1, 2 and 3.2 It is this cargo that has made Richard Montgomery considerably better known than most of the thousands of other wartime wrecks around Britain.
The wreck is sometimes characterised rather more dramatically than the official evidence warrants. The Maritime and Coastguard Agency's current position is that the risk of a major explosion is believed to be remote. Nevertheless, the combination of explosives and a steel hull that has spent more than eighty years exposed to the strong tides of the Thames Estuary makes continued monitoring prudent.1
A wreck in two pieces
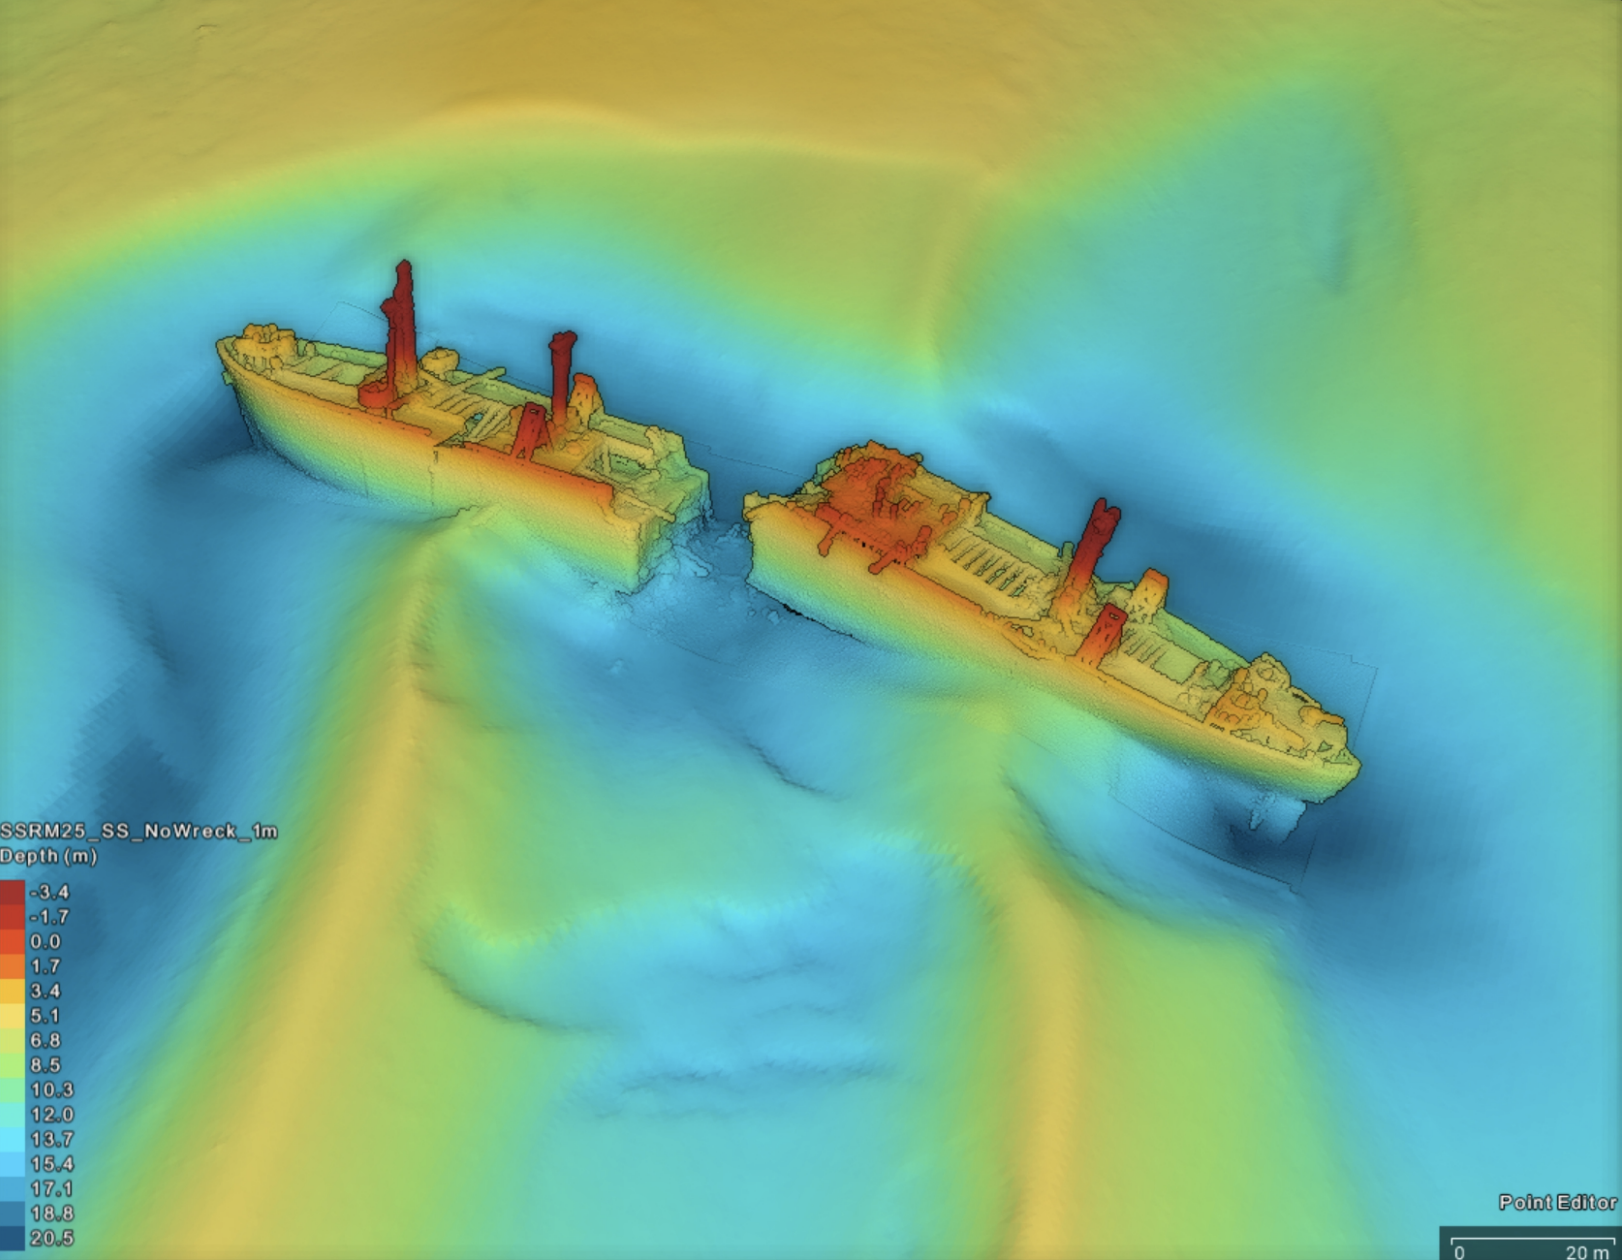
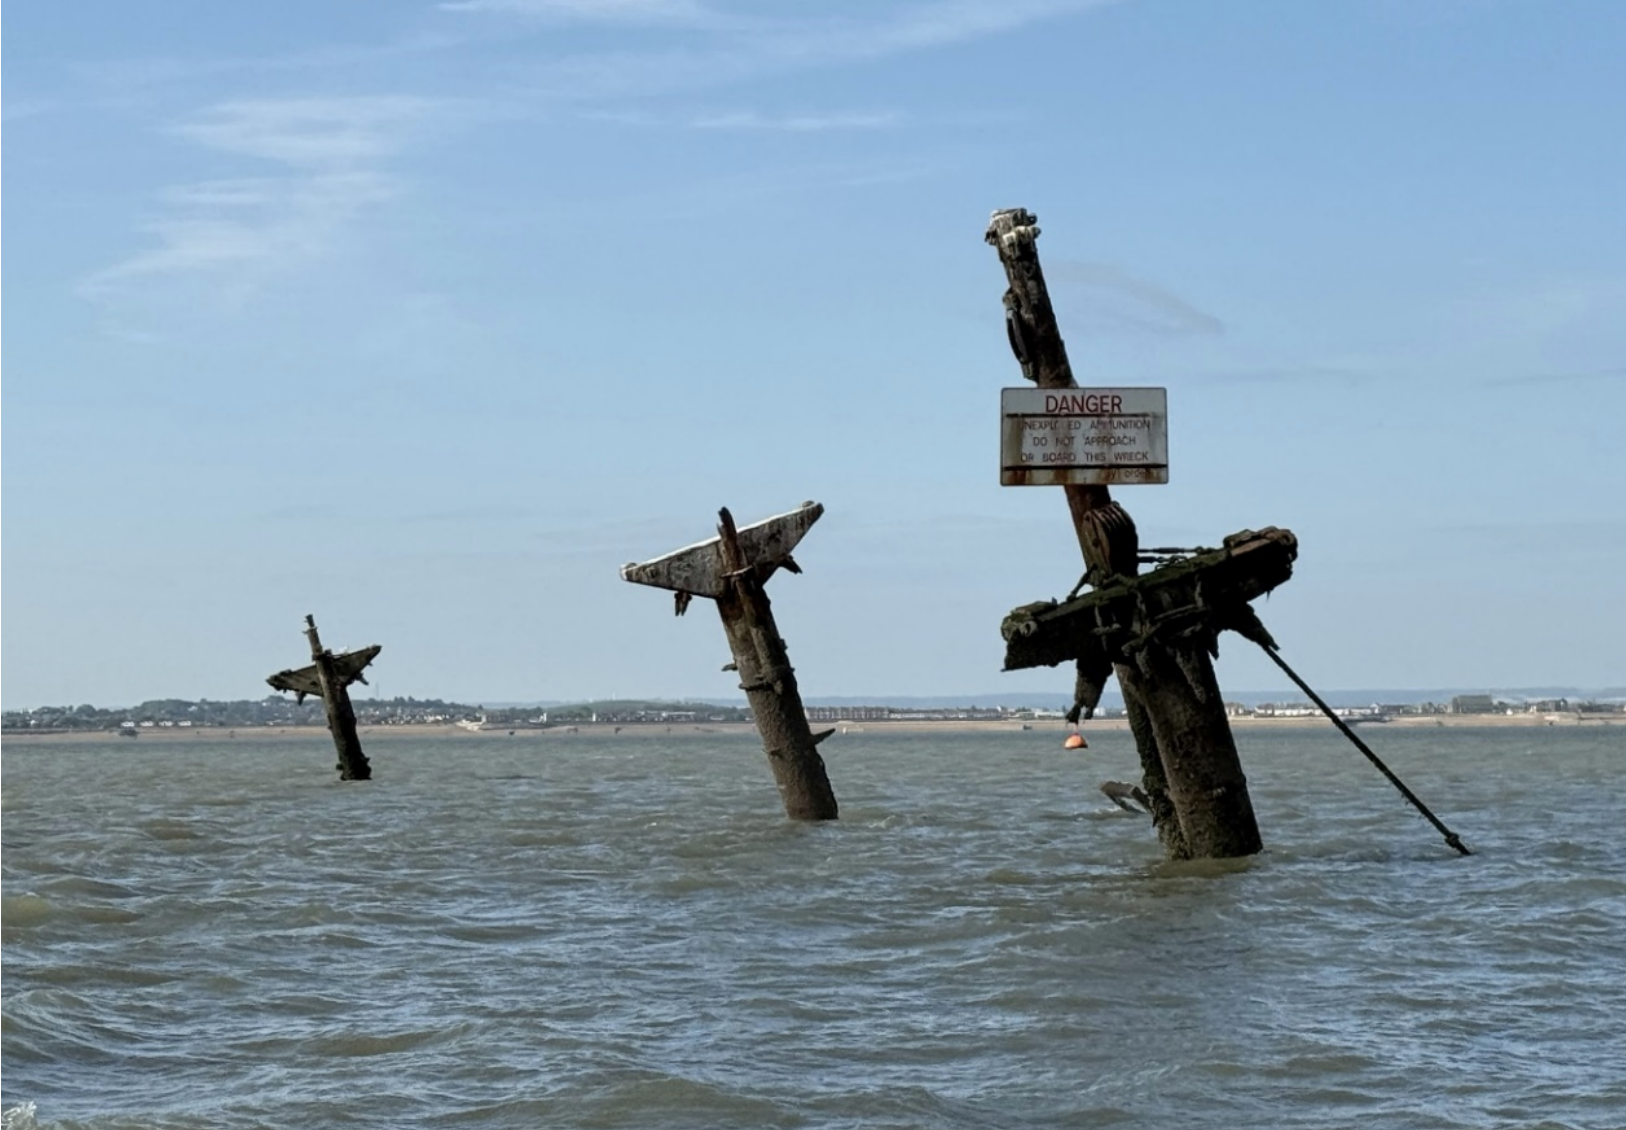
Today the wreck lies in two principal sections in its own scour pit on Sheerness Middle Sand. The underlying surface is exposed bedrock believed to be London Clay. The ship lies across the direction of the tide, with her three masts still visible above the water at all states of tide.2
The 2025 survey image makes the scale of the damage particularly clear. The bow and stern are no longer connected by an intact hull. Between them is an area of collapsed structure and debris, while the seabed has been shaped by decades of tidal scour around the two surviving sections.
Watching the wreck change
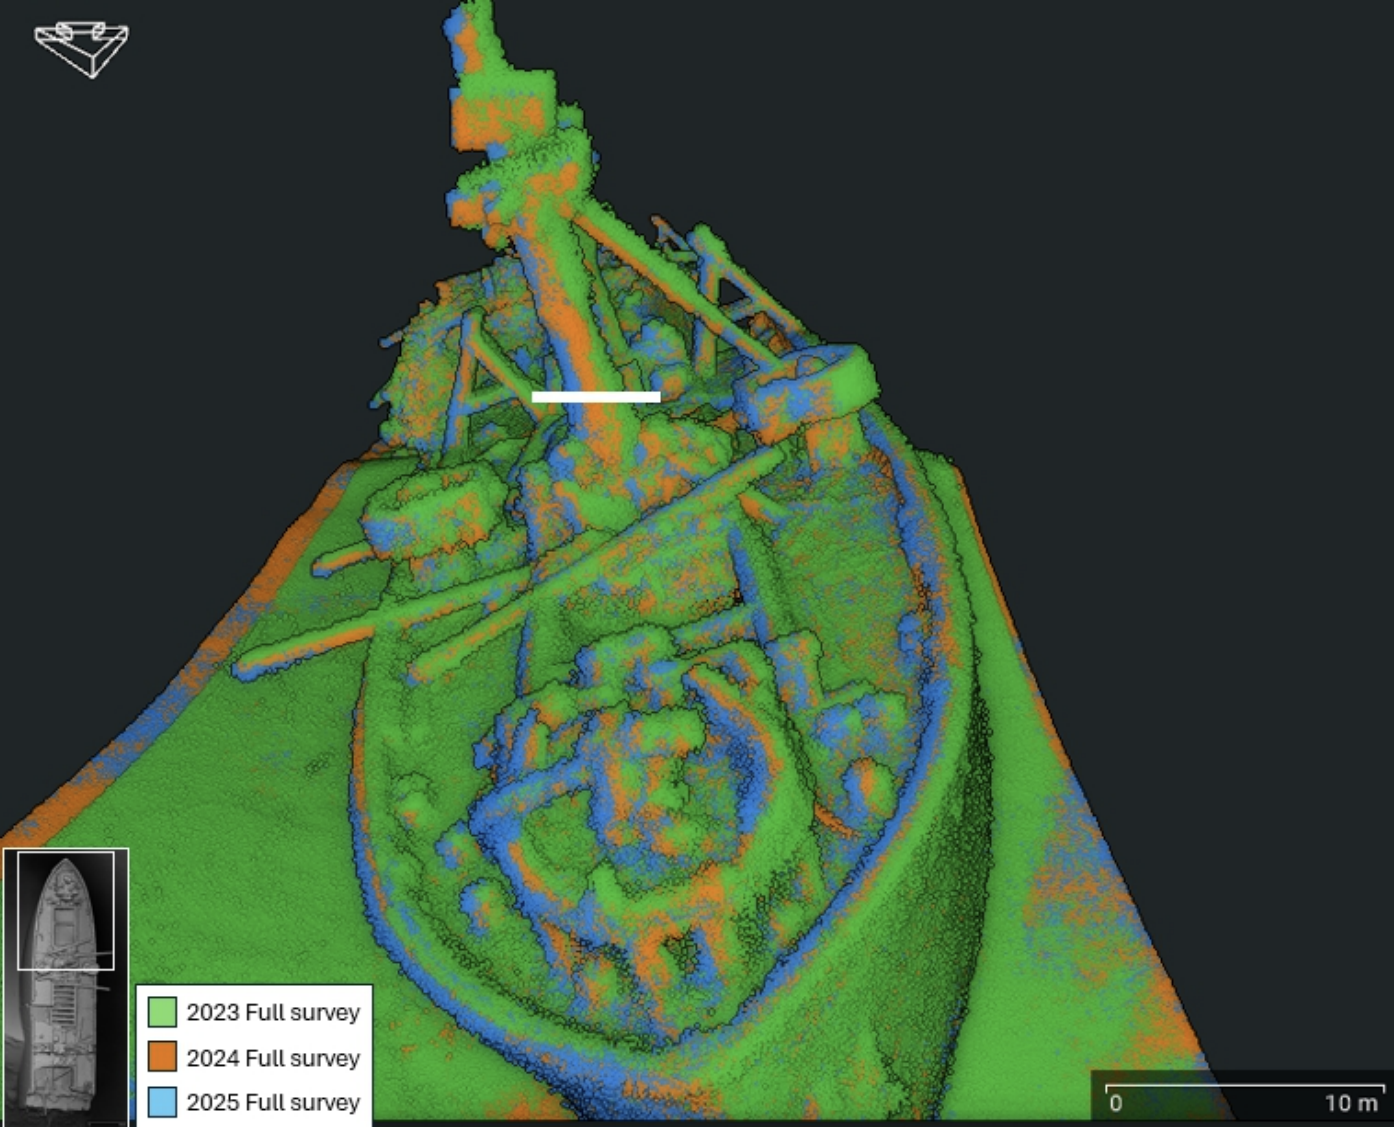
The reason the modern surveys are so useful is not simply that they produce detailed images of the wreck. They allow successive surveys to be placed directly over one another, turning structural deterioration into something that can be measured.
The 2025 analysis uses 97 individual features distributed across the wreck as repeatable comparison points. Six additional 'Key Areas' have been identified where previous surveys have demonstrated more significant structural change.2
One of the broader trends is the increasing tilt of the forward section towards the east. This has been visible over successive surveys and continued in 2025, indicating continuing instability within the forward part of the wreck.2
Hold 2
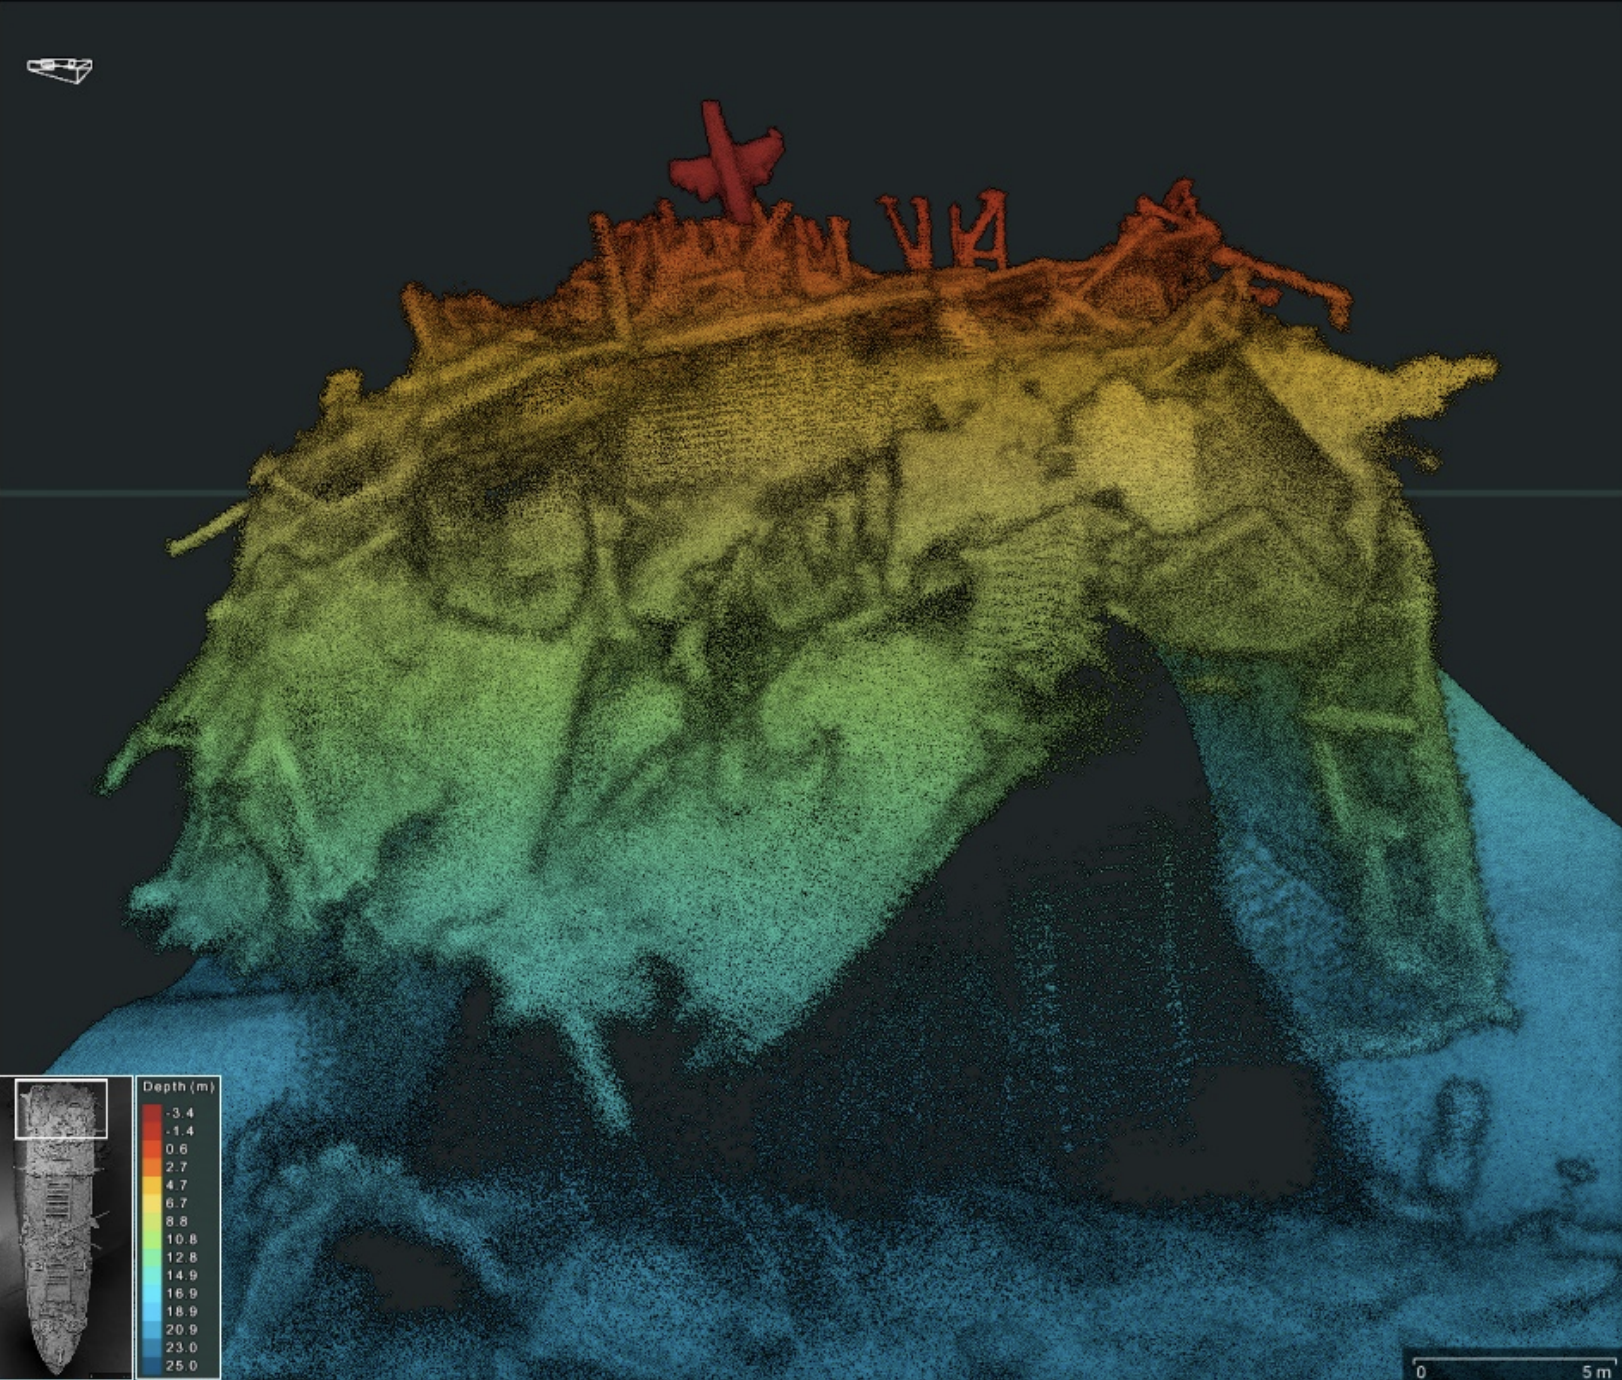
The forward section is also seriously hogged almost halfway along the No. 2 Hold hatch. The deformation has produced a crack in the upper port side while the lower starboard side is significantly buckled. The MCA survey describes the effect as giving the appearance that the forward section is itself beginning to split in two, pivoting around the starboard rim of Hold 2.2
Flexing of the upper deck has already caused part of the deck and approximately half of the Hold 2 hatch-cover supports to collapse into the 'tween deck below. Survey comparisons show significant downward movement of the 'tween deck associated with this area of structural failure.2
The location is particularly significant because Holds 1, 2 and 3 form the forward cargo section in which the remaining munitions are concentrated.
The collapse between the two halves
Most of the six Key Areas showed little or no significant change between the 2024 and 2025 full surveys. One did not. Key Area 6 covers the boiler-room casing, bridge deck and boat deck around the broken central part of the ship.2
This structure was left unsupported when Richard Montgomery broke in two in 1944. Wave and current action have progressively weakened it and material has been falling into the gap between the forward and after sections. Earlier surveys had already recorded significant deterioration here, but between 2024 and 2025 a further substantial collapse occurred.2
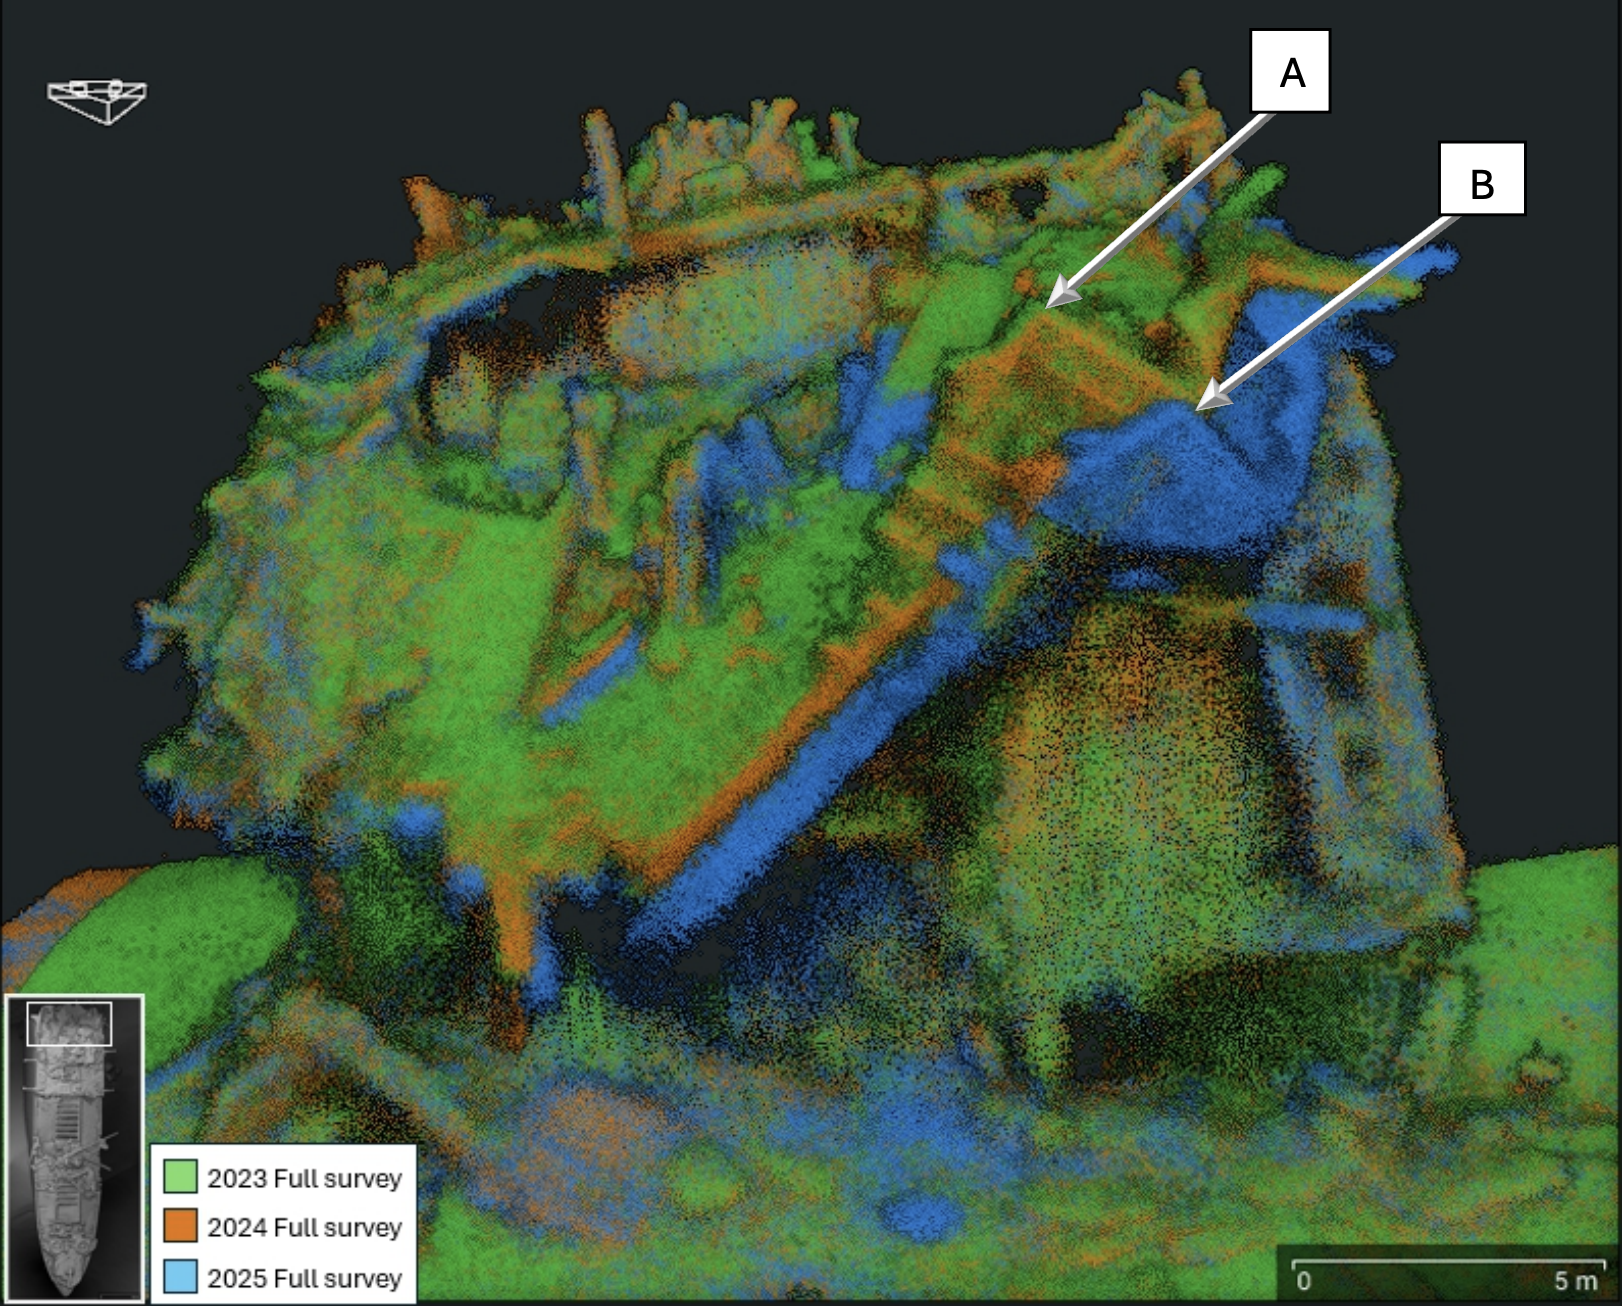
The survey measured a total displacement of approximately 2 metres in the highlighted part of the structure, including around 1.3 metres of vertical displacement. Several objects lying on the deck were also displaced.2
This does not mean that the wreck as a whole is suddenly collapsing. Indeed, the other monitored Key Areas were broadly unchanged. What it demonstrates is why the long sequence of repeat surveys matters: gradual deterioration can be separated from individual structural failures and measured rather than inferred.
The seabed around Montgomery
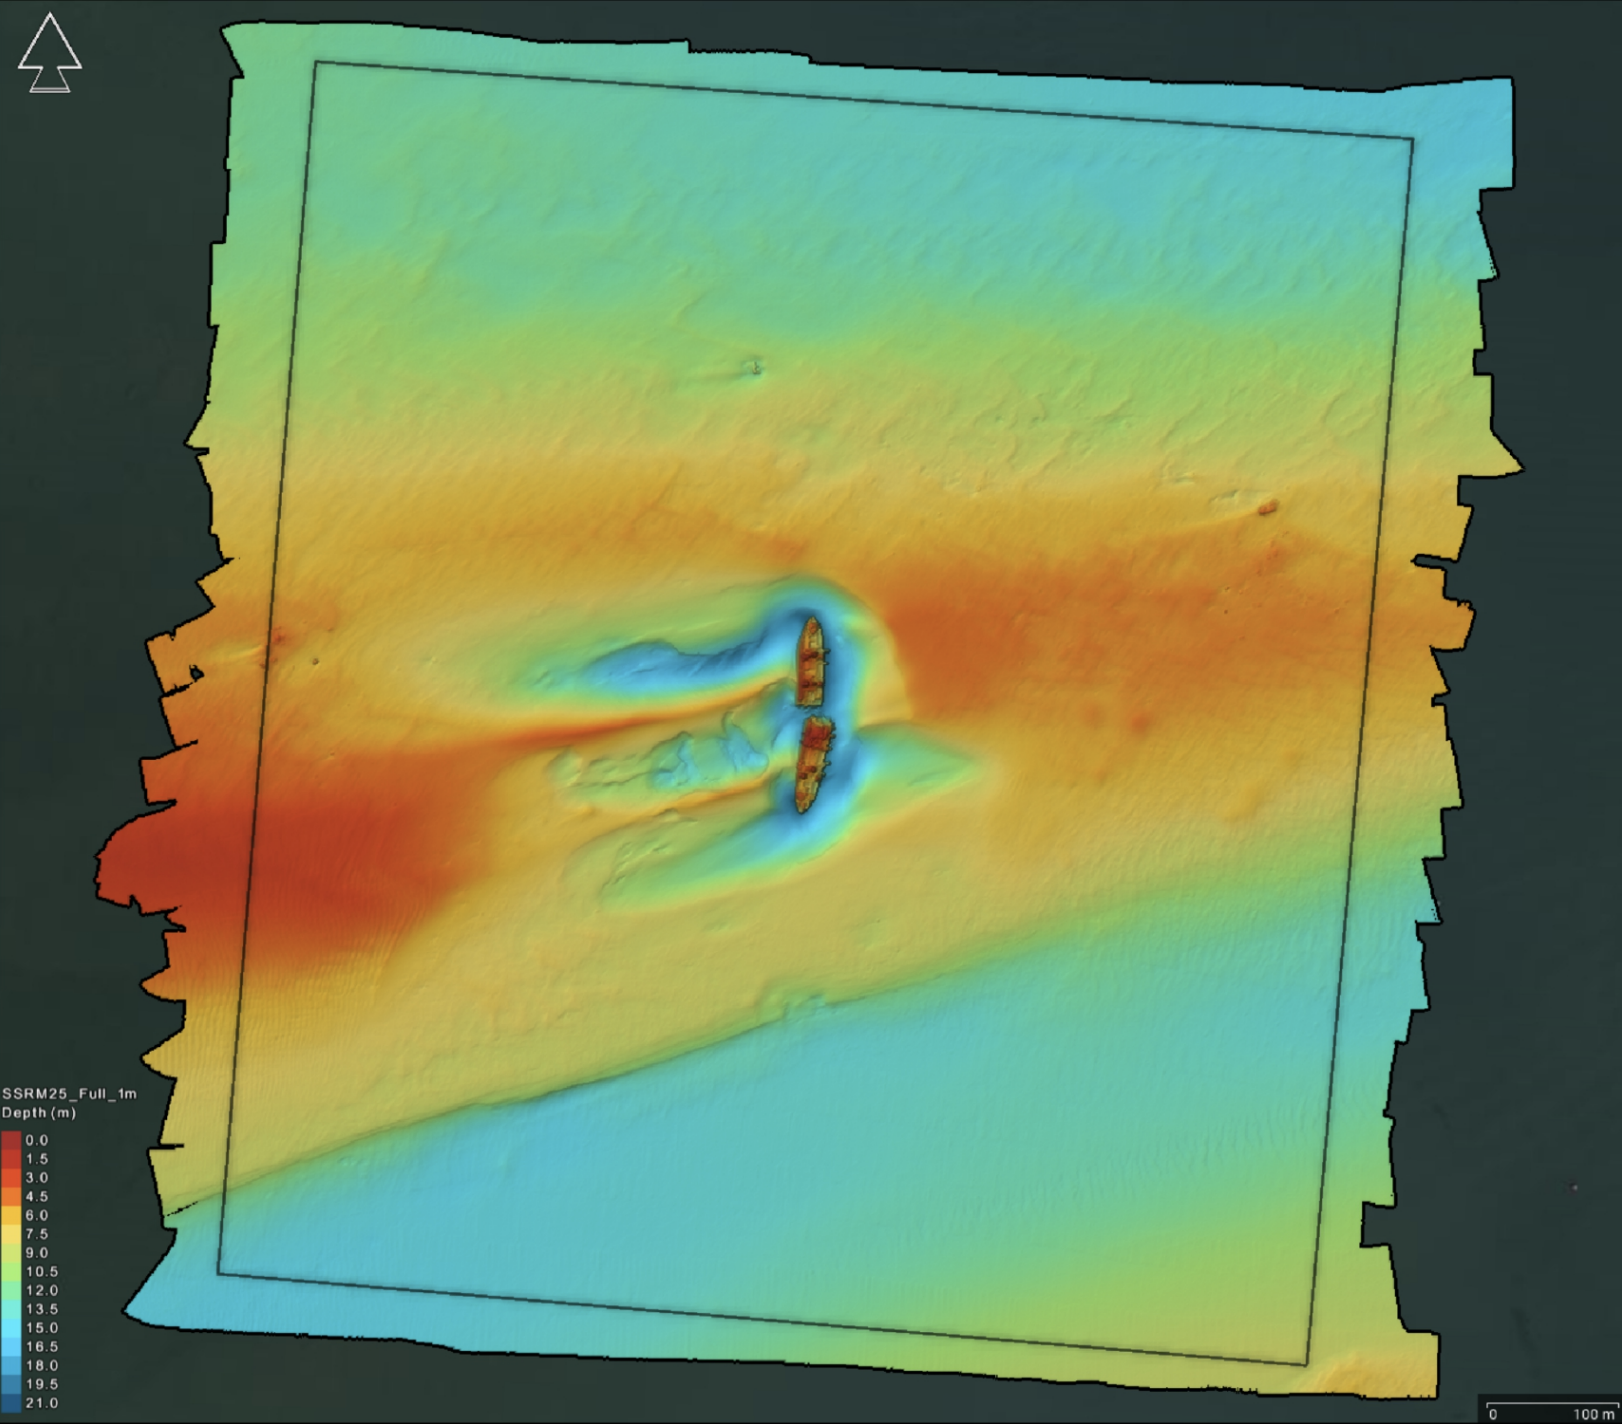
Monitoring extends well beyond the steel structure itself. The 2025 full survey included the prohibited area and seabed extending at least 400 metres from the wreck, including the edge of the neighbouring dredged channel. The work used a Kongsberg EM2042 multibeam echosounder, while the structures above the waterline were recorded using an Ouster OS1 laser scanner.2
This produces the almost complete model seen above: submerged wreck, exposed masts, scour and surrounding seabed brought into a common survey. The report states that positioning was post-processed to improve accuracy to approximately ±5 cm, while the post-processed vertical uncertainty of the positioning system was less than ±0.05 m.2
Changes are visible in the seabed as well as the wreck. Between the 2024 and 2025 surveys most of the surrounding seabed changed by no more than approximately ±0.3 metres, although localised differences were considerably greater. The surveys also maintain a catalogue of seabed contacts around the site.2
A prohibited wreck
The remaining cargo also explains why this is not a wreck that can simply be visited. SS Richard Montgomery is designated as a dangerous wreck under Section 2 of the Protection of Wrecks Act 1973. Entry into the prohibited area without written permission from the Secretary of State for Transport is an offence.1
The exclusion area is marked by buoys and the wreck itself carries warning notices attached to the exposed masts. Medway Ports maintains the markers on behalf of the Maritime and Coastguard Agency and provides 24-hour radar surveillance of the site.1
Vessel: SS Richard Montgomery
Type: EC2-S-C1 Liberty ship
Builder: St. Johns River Shipbuilding Company, Jacksonville, Florida
Built: 1943
Gross tonnage: 7,146 GRT
Grounded: 20 August 1944
Location: Sheerness Middle Sand, Thames Estuary
Condition: Two principal hull sections within a scour pit
Remaining cargo: Approximately 1,400 tons net explosive quantity of munitions
Protection: Dangerous wreck designated under Section 2 of the Protection of Wrecks Act 1973
The missing survey
Which brings us back to the blank square on Wrecksite.
It would be reasonable to look at the map and assume that no detailed bathymetric survey exists for this part of the Thames Estuary. In reality the opposite is true. The gap contains one of the most intensively monitored wrecks in British waters. High-resolution multibeam surveys have been carried out regularly since 2002, specifically to identify deterioration and provide evidence for the continuing management of the site.1
The 2025 survey alone can resolve the two halves of the ship, individual deck structures, hatch supports, areas of collapsed plating, the surrounding scour and changes measured against previous surveys. What Wrecksite lacks is not evidence that the wreck has been surveyed, but access to that underlying survey dataset in the bathymetric sources from which the interactive map is built.
For now, the grey square remains.
Why isn't the wreck shown?
Detailed multibeam survey data of SS Richard Montgomery exists and is used by the Maritime and Coastguard Agency to monitor the wreck. That underlying high-resolution dataset is not currently available through the bathymetric data sources used by wrecksite, so the wreck cannot be presented here in the same way as our other surveyed sites.
The MCA does, however, publish detailed survey reports, including imagery and comparisons showing how the wreck is changing over time.
View the official survey reportsSources
- Maritime and Coastguard Agency, SS Richard Montgomery: background information, updated 11 March 2026. GOV.UK
- Maritime and Coastguard Agency, SS Richard Montgomery: Survey Report 2025, 16 October 2025. Survey of the wreck, surrounding seabed and exposed structures, including comparison with the 2023 and 2024 full surveys.
- Maritime and Coastguard Agency, SS Richard Montgomery information and survey reports. GOV.UK